Basic Canary releasing on Kubernetes with Nginx Ingress
This blog shows how you can implement basic Canary Release patterns on Kubernetes with the Nginx Ingress Controller.
Jan 12, 2023

Benny Cornelissen
Cloud Consultant
Earlier this week, we had our first Skyworkz Office Day for 2023. I love the Office Days. Not just because of catching up with our team, but also because during those Office Days someone just might throw you a fun curveball. "How would you approach XYZ?"
This time it was Jeroen who threw me a curveball. He was looking at Canary Releasing for Kubernetes workloads, as he wanted to test an overhauled version of a backend API without immediately replacing the existing one. Of course the Kubernetes ecosystem offers various great solutions for release patterns like this, like Argo Rollouts. But if you're only looking at applying the pattern for a first/single time, implementing Rollouts to get it done is a little overkill. Also, they didn't quite have time for that..
"Do you know a way to do it without something like Rollouts?", Jeroen wondered.
I didn't immediately have an answer, but I figured that if it could be done, my best bet was going to be the Ingress Controller. After all, the hard part isn't running 2 versions of your application side-by-side in Kubernetes. You can create multiple releases of a single Helm Chart, apply namePrefix on a Kustomize setup, or simply create differently named Kubernetes resources for your Deployment and Service.
The hard part is splitting traffic the way you want.
Traffic splitting for different use cases
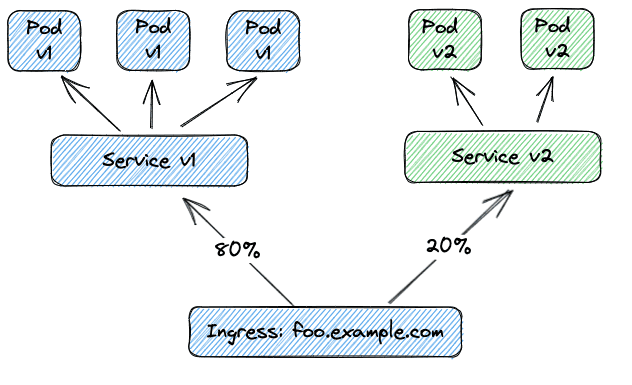
Typically we can identify two specific use cases for our Canary Release. The first and simplest pattern is to simply send a certain percentage of traffic to the new version. The downside to this pattern is that there's no way of knowing beforehand if you're going to hit v1 or v2. For 'blind testing', however, this is perfectly fine.
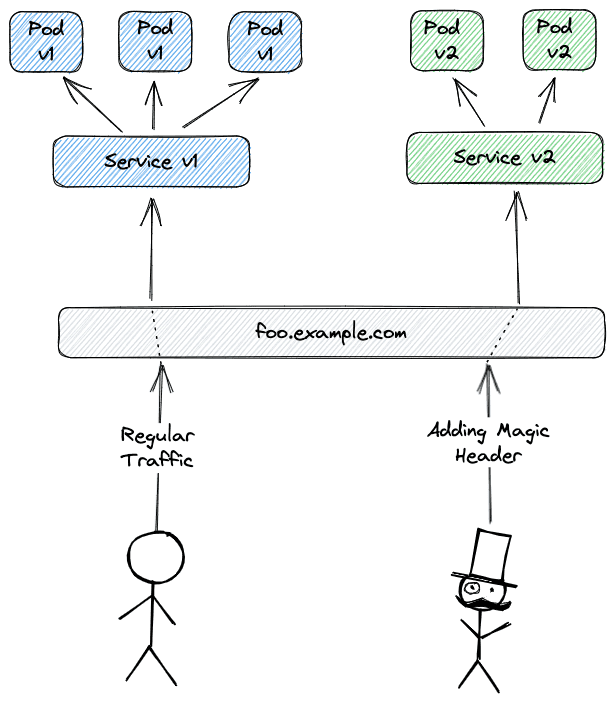
The second scenario offers client-side control. Instead of sending 1 out of every 5 requests to v2, only certain traffic is sent to v2; everything else is sent to v1. Which traffic to send to v2 can be determined in various ways, like HTTP headers that are added in the requests, or cookies.
Canary Releasing with Nginx Ingress Controller
One of the most widely-used Kubernetes ingress controllers is the Nginx Ingress Controller, and as it turns out it offers everything we need to make basic canary releasing happen. For our examples we will assume that you have the Nginx Ingress Controller running and the IngressClass that uses it is named nginx.
Setting things up
Step 1: Create Kubernetes manifests for v1 and v2 of your service, so that there are separate Deployment and Service resources for both versions. Make sure both will use the same Namespace.
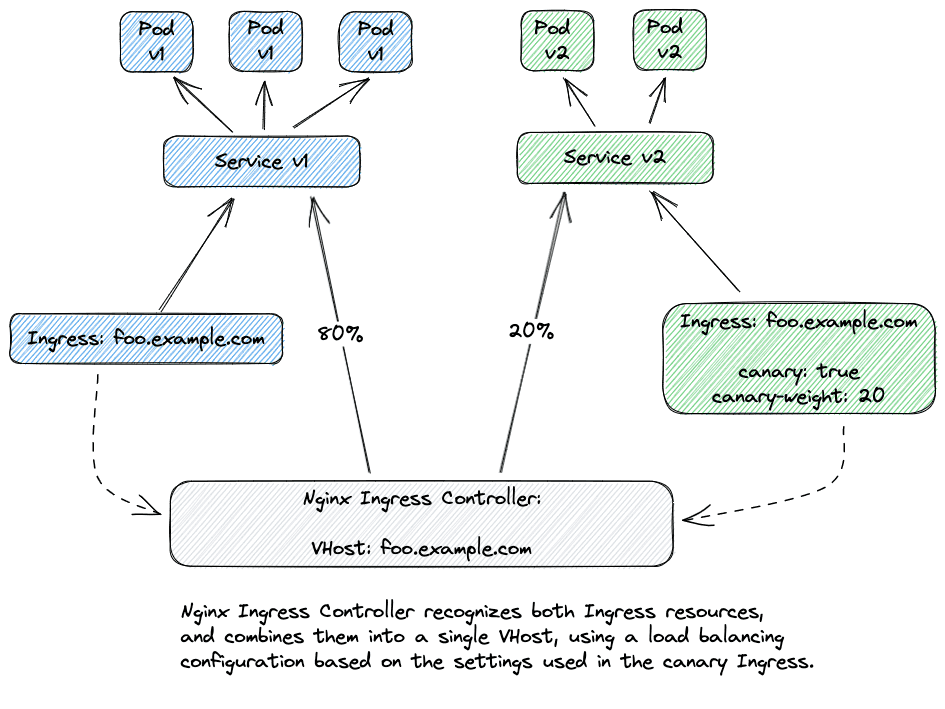
Step 2: Create separate Ingress resources for v1 and v2, but make sure they use the same hostname.
Step 3: Add annotations to the Ingress for v2:
to mark an
Ingressas Canary, addnginx.ingress.kubernetes.io/canary: "true"(only add this to the Ingress of v2, don't set any canary-related annotations on the Ingress for v1)for weight-based splitting, add:
nginx.ingress.kubernetes.io/canary-weight: "20"(this sends 20% of traffic to v2)
NOTE: You can find a full working code example at the end of this blog post
If you deploy this, the Nginx Ingress Controller will end up combining both Ingress resources into a single Nginx VHost with balancing enabled to route traffic.
If instead, we want to route traffic to v2 based on a HTTP header x-use-v2 that should be set to true, our Ingress looks like this:
For more information on using the Canary annotations, check out the Official Documentation.
Limitations
At the time of writing it is only possible to have a single canary per Ingress. That will be fine for most people, but if you were planning on using Nginx' Canary functionality to test many feature branches in parallel, you're going to be disappointed.
Testing it for yourself (full code example)
If you want to give this approach to Canary Releasing a go on your own Kubernetes cluster, you can find a full code example below. Make sure to update the Ingress to use the correct hostnames though!
Step 1 - Deploy v1 and v2
First let's create a Namespace: kubectl create ns echo-canary
Then apply the manifest below:
Next, add the Ingresses for both echo-v1 and echo-v2:
To test if everything works as expected, you can run the following in a terminal:
As you can see, roughly 20% of our requests are going to echo-v2. Keep in mind that Nginx will do this balancing based on certain time slices, so if you would run the same command with sleep 10 instead you might be getting more random results. Try playing with the nginx.ingress.kubernetes.io/canary-weight value to see how the behaviour changes as more or less traffic is sent to echo-v2.
Now you know how to set up basic Canary Releasing on Kubernetes without adding extra tooling. If you want to apply this method of releasing to all your services though, I do highly recommend checking out purpose-built tooling like Argo Rollouts, which allow you to further finetune the behaviour, automate promotion based on analysis, and much more.